
|
|
|
|
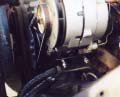
Delco Alternator Swap The trusty 87 Range Rover has only left me stranded on two occasions, and both times it was a dead alternator that brought the "Best 4 by 4 by far" to a halt by the side of the trail. More specifically, it was a dead diode in the alternator and then a dead battery. Judging from all of the questions on replacements this is not an uncommon Rover malady, especially as machinery reaches the 100,000 mile mark. The simplest solution is as close as your local Rover dealer or parts supplier. They can supply you a replacement Lucas for under $250 or so. Installation only takes a few minutes, and you are on your way, probably with a warranty. This may just be the most cost / labor effective solution, especially if you'll be selling the Rover in the next few years. However, what if you aren't planning on selling off your friend so soon, and what if you can't always be within driving distance of a Rover-savy supplier when the juice stops flowing? Wouldn't it have been nice if it just took a basic Delco alternator? Virtually any parts store from Anchorage to LaPaz could solve the problem. Hmmmmm. Now, those that know me know how much I like to keep things stock and simple, but this swap was just too tempting to pass up. The Series, motorhome, and boat already have similar Delco units, why not the Rangie too? Just to keep things simple I had standardized on the same one as is used in a motorhome, model 7294, available at many auto parts stores. It's spec'd at 94a output which is slightly above the rating of the Lucas unit, and at under $100 the price wasn't all that bad either. Click on images to view full-size One major question was the tachometer hook-up. It would be All that's needed to do the swap is a simple bracket to adapt A couple important notes: 1.Because the Delco pulley diameter is slightly different, the tach reads a bit low. Not a big deal, especially with the automatic transmission deciding shift points for you. If you want to get it to read correctly almost any speed-shop carries Delco alternator pulleys in a variety of sizes. 2. If for some reason you take the alternator apart, when you put it back together it can be a real job getting it assembled with the spring loaded brushes in place. If you look on the outside by the brushes, there is a little hole. This allows you to install the brushes and insert a piece of stiff wire to hold everything in place while you put the case halves back together. Withdraw the wire and the brushes snap in place. Neat! However, be warned too that in most cases your warranty is void if the cases are split. In many cases there is a little tell-tale tag installed. I guess this means to be extra careful. 3. Use at least grade 5, or even better, grade 8 bolts for attaching things. 4. The wiring shown is for the 87 Range Rover. Other models may differ, so consult the wiring diagram in your owners manual to be sure. 5. Finally, and most important: You have to judge your own capabilities and determine if you have the appropriate experience and are capable of performing these modifications which include cutting, welding, and electrical work. This modification may void other warranties, so be sure to check first. For safety, be sure to always disconnect the battery before working on the vehicle. |
Send mail to
john@quietcanyon.com with
questions or comments about this web site.
|