
|
|
|
|
LUCAS TO DELCO ALTERNATOR CONVERSION (click images for full size view)
OK, OK, so I'm always the one expounding on the virtues of sticking with original Land Rover parts. Well, even I make exceptions. The old S-III stock Lucas alternator could keep up with the load of original lighting and equipment, but that was about it. Add driving lights, 12 volt air compressor, and keep the interior fan running to circulate the hot air in the footwells, and the voltmeter can tell you that the alternator just won't keep up with the load. Then one weekend on a fun and easy Pinyon Mountain family trip the alternator light began to give a warm glow, and the voltmeter slowly dipped below the critical 12 volt level. It was about time to think about drinking warm beer. (If you don’t get this, then you haven’t owned British cars very long.) I could replace the worn out electricity maker with a rebuilt unit, but that’s expensive, and the output would still be marginal. A much better alternative is to swap a stock Ford or GM unit. I’ve done this many time in the past in cars including my 4-Runner, E- Type, Lotus, and others. The Ford has an advantage that it’s smaller, but it requires a separate regulator. No big deal for a street machine, but for off-road the fewer connections the better. The Delco unit is larger but with internal regulator it is the all-time favorite, and what do you know, British Pacific makes a bracket kit for this. It’s simple, sturdy, and the price is a deal compared to measuring and cutting the parts yourself.
WHAT YOU NEED TO BUY:
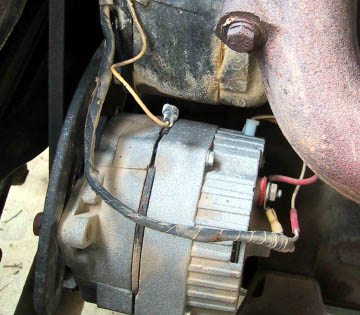
MOUNTING First, DISCONNECT THE BATTERY NEGATIVE TERMINAL!!! Now, after your Land Rover has cooled off, remove the Lucas alternator and mounting bracket. Next, pull off the two bolts holding the timing marker on. This is by far the most difficult part of the whole job because you have to pull the crank pulley out to get just one of these lousy bolts out. Oh well, that’s the worst part. Now, get a GOOD 3/8" NC tap and tap the hole in the block that the long bolt went through. Go to a real honest-to-gosh industrial supply house and buy a good tap. A cheep tap will be impossible in the limited space, and a good one will be effortless. In Orange County, try McFadden-Dale Hardware at Edinger & Grand. Now, everything is prepped. The alternator bracket mounts on the block where the timing marker bolts were, so you must trim the spacers that were behind the marker to make up for the space the new bracket will take. Mount the bracket on the block, under these bolts, and replace the spacers you cut and the timing marker. Do not install the old slotted adjustment bracket, and leave the bolts loose. Next, take the 3/8" alternator bolt and be sure that it goes through and threads into the hole you just tapped. If everything is OK to this point, put the alternator on the 3/8" bolt, and replace the original fan belt. Adjust the alternator so the pulleys are lined up, and measure the spacers needed in front and in back of the alternator. You should need few, if any at all in the front. Pull the lower bolt out, install the appropriate spacers, and replace everything.
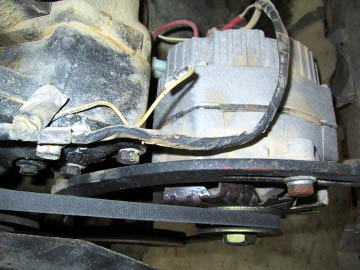
Alternator and bracket from below, front view If all is correct the alternator should be in place now, with the stock fan belt on. Next, loosely attach the slotted end of the new top adjustment bracket on the alternator and see which bolt on the block the other end matches up to, making sure that the bracket doesn’t fowl the alternator pulley . This should be fairly obvious. Now, pull that bolt and install the bracket.
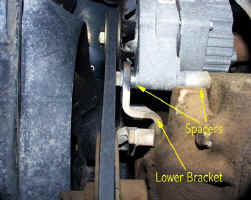
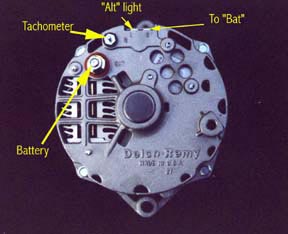
Alternator and bracket, from directly below. You will probably have to replace the bolt with one slightly longer to allow for the thick bracket. The mechanical part should be done now. Just tighten everything up and make sure that everything is properly in place. ELECTRICAL This is by far the simplest part of the whole job, but the one that scares everyone off. You have only three wires to worry about with the Delco unit. First, take the thick brown one, cut the old spade connector off, and replace it with an eye connector, and attach this to the "bat" terminal on the alternator. (It might be easier to loosen the alternator belt and allow the alternator to flop to the side, exposing the connections) Next, the smaller brown and yellow wire from the warning light goes to "1 terminal on the alternator. This is the spade connector in the alternator closet "bat" terminal. Splice this into the special Delco connector you purchased, using a crimp connector or solder and cover with shrink tube. Finally, connect a wire from the #2 terminal to the "bat" terminal, using the other terminal of the special Delco connector. For safety I like to use a GM-type fuse to do this, just in case. Now, reconnect the alternator belt and reconnect the battery terminals.
Wring for Delco. NOTE!!!!!!!!! This is actually for the Range Rover Conversion, but wiring is similar for the Series. Click on image to enlarge. Check everything by putting a volt meter on the battery to be sure that volts are about 13-15 volts with the engine running above idle speed. That’s it, your all done. You now have MORE POWER! Happy Rovering! NOTE: I understand that British Pacific no longer carries the bracket. If I can find another source I'll post the info here - but - as you can see, it is a fairly simple thingie that can probably be fabricated with a little patience and a heat source to help the bend. |
Send mail to
john@quietcanyon.com with
questions or comments about this web site.
|